Manually installing updates on VMware vSphere 5.x using esxcli
December 17, 2012 Leave a comment
I recently had a situation where i needed to manually update a VMware vSphere 5.0 U1 host rather than using update manager in vCenter. To do this I performed the following steps:
Firstly, put the host into maintenance mode, by either shutting down or moving VMs off the host first, and then right clicking the host and choosing ‘Enter Maintenance Mode’.
Next, temporarily enable SSH on the host. To do this you need to start the SSH service, which can be found under ‘Configuration’, then ‘Security Profile’. Once on the ‘Security Profile’ screen, click properties under ‘Services’

Modify the SSH service properties under ‘Security Profile’
On the Service Properties screen highlight the SSH service and click the ‘Options’ button:

Start the SSH service on your ESXi 5 host
Click ‘Start’ to start the SSH service. On the ‘Options’ screen you can also choose whether to have the SSH service start and stop automatically with the host. This may be more convenient, but is not a great idea from a security perspective, so it is better to start and stop the service manually when you need it.

Note that when the SSH service is running a warning logo will appear against your host in vCenter to alert administrators to this fact. Once SSH is running you will need to use WinSCP to upload the patch you wish to install to one of the datastores on your host. If you don’t already have it installed on your workstation download and install WinSCP. Then log in to your host using WinSCP and and creating a folder on one of your datastores called ‘Patches’. Next, download the relevant patch from the VMware downloads web page, and then copy the patch to the newly created ‘Patches’ folder on your host.
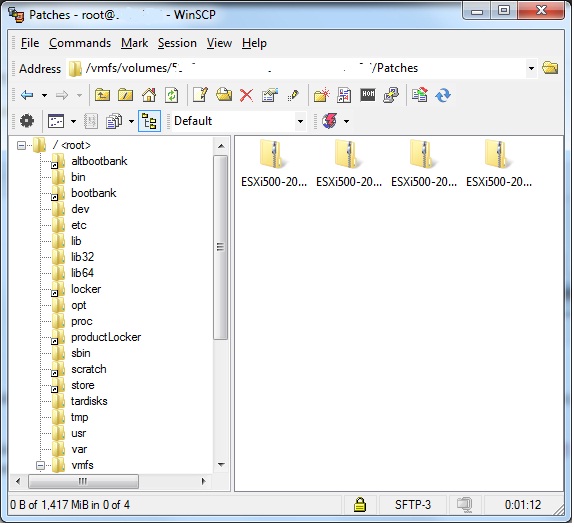
Create a folder and upload patches using WinSCP
Close WinSCP, and fire up an SSH session to your host using Putty. Log in, and then run the following command where YOUR_DATASTORE is the name of the datastore where you stored the patches, and PATCH_NAME.zip is the name of the patch that you want to install
esxcli software vib install -d /vmfs/volumes/YOUR_DATASTORE/Patches/PATCH_NAME.zip
PLEASE NOTE: If your host is installed using custom drivers for either your storage controller or network cards you need to use the ‘update’ command rather than the ‘install’ command to prevent your custom drivers being overwritten. Failure to do this may temporarily cause you problems on your first reboot after installing the patch. On the second reboot of your host the patch will be uninstalled revert to your originally installed VMware version. For more info see here. This was relevant in my case as I was using a custom install of ESXi 5.0 U1 with an Adaptec 6805E RAID card.
esxcli software vib update -d /vmfs/volumes/YOUR_DATASTORE/Patches/PATCH_NAME.zip
Here is a screenshot of the update process before:

Running the esxcli software vib update command
And after. Note that using the update command will show you which VIBs have been updated, which have been removed, and which have been skipped:

Patch installation result
Once the patch is installed simply issue the reboot command to reboot the host
reboot
Once your host has rebooted verify the new version number in vCenter. Your update is complete.
References:
