Apply a Group Policy to a Specific Operating System

During our Windows 7 rollout it was necessary to apply some specific registry settings to the new Windows 7 machines without affecting the legacy Windows XP clients. This can easily be done by creating a WMI filter in the Group Policy Management Console and applying it to the relevant GPO.

To do this simply fire up gpmc.msc and click on the ‘WMI Filters’ section under the domain you want to create the group policy object (GPO) in.

WMI Filter section in GPMC

Right click the ‘WMI Filters’ section and choose ‘New’. Give the filter a name. Click on ‘Add’ and type the following to create a filter for Windows 7:

select * from Win32_OperatingSystem where Version like “6.1%” and ProductType=”1″

Adding a WMI filter for Windows 7

Finally, you need to apply this filter to the GPO that you want to use. In this example a GPO called ‘Windows 7 GPO’ has been created. Highlight the GPO in the Group Policy Management Console, and then under the ‘Scope’ tab, apply the WMI filter you created, by selecting it from the drop down list in the ‘WMI Filtering’ section as shown below:

Applying a WMI Filter to a GPO

You can filter the following operating systems in this way by adjusting the query in the WMI filter. Operating systems can be defined as follows:

Windows XP:

select * from Win32_OperatingSystem where (Version like “5.1%” or Version like “5.2%”) and ProductType = “1”

Windows Vista:

select * from Win32_OperatingSystem where Version like “6.0%” and ProductType = “1”

Windows 7:

select * from Win32_OperatingSystem where Version like “6.1%” and ProductType = “1”

Windows Server 2003:

select * from Win32_OperatingSystem where Version like “5.2%” and ProductType = “3”

Windows Server 2008:

select * from Win32_OperatingSystem where Version like “6.0%” and ProductType = “3”

Windows Server 2008 R2

select * from Win32_OperatingSystem where Version like “6.1%” and ProductType = “3”

You can use the ‘ProductType’ part of the query to specify whether the operating system is a client, server, or domain controller.

ProductType = “1” is a client

ProductType = “2” is a server operating as a domain controller

ProductType = “3” is a member server. i.e. not operating as a domain controller

Programming Group Pickup on the Samsung DCS Compact II

I struggled to find information on adding extensions to pickup groups on the aging Samsung DCS Compact II in one of our offices. Anyway I recently got hold of this information, so thought I would share it in case anyone else is in the same boat.

Add an extension to a Pickup Group

  1. Press TRSF then 200
  2. Enter the passcode the default is 1234
  3. Press the Volume + key to enable customer programming mode
  4. Press Speaker 302 (If at this stage you here a tone and the words NOT PERMIT are shown on the display, you have been locked out of this feature by your system maintainers. Extensions can be added to group pickups by starting this process again from the beginning and using TRSF 800 to enter Tech Support mode, rather than customer programming mode, but you will need the tech support passcode!)
  5. The first extension will be displayed in brackets followed by the words PICKUP GRP, beneath this the pickup group for the selected extension will be displayed after the words PICKUP GRP:. The cursor will be positioned under the selected extenstion number at this stage.
  6. Type in the extension number you want to add to a group. The current pickup group (if any) will be shown on the line underneath.
  7. There are three buttons under the display on the handset. Press the right one to move the cursor to the PICKUP GRP: section of the display. Type in the group number you wish to add the extension to.
  8. Press the Speaker button and then the TRSF button to exit

Program the Group Pickup (GRP P/U) button

  1. Press TRSF then 200
  2. Enter the passcode the default is 1234
  3. Press the Volume + key to enable customer programming mode
  4. Press Speaker 722
  5. The first extension will be displayed in brackets followed by the words KEY (MAST), beneath this the 01: will be displayed (meaning button 1 on the handset) followed by the curent programmed function on that button. The cursor will be positioned under the selected extenstion number at this stage.
  6. Type in the extension number whose handset you want to programm the button for.
  7. The cursor will position under the button number on the line below.
  8. Use the volume + button to scroll through the available buttons on the phone.
  9. When you get to the one that is shown as GPIK, stop scrolling (on our handsets this is button 5)
  10. There are three buttons under the display on the handset. Press the right one to move the cursor to the right then press it one more time, and type in the number of the Pickup Group you want to add the handset to.
  11. Press the Speaker button and then the TRSF button to exit

Enabling root SSH access on an ESX host over the network

This post explains how to enable root SSH access on an VMware ESX host over the network, when you don’t have physical access to the server console. Root SSH access is disabled by default. Before enabling root SSH access please assess any security implications of this action in your environment.

Firstly, use the vSphere client to access the host directly. i.e. connect directly to the IP address or hostname of the host rather than logging in to vCenter. Log in using the root account. Once logged in highlight the ESX host in the left pane of the screen, and then click on the local users and groups tab in the right hand pane of the screen, as shown below:

local users and groups

Right click anywhere in the list of users and choose ‘Add’. Enter the details for your new user account as shown below, making sure that you tick the ‘Grant shell access to this user’ check box. You will also need to specify a password of more than 8 characters:

Add a local user to an ESX host

You can use an SSH client like Putty to connect to your ESX host. You may find that when you initally try to connect to the ESX host via SSH that you are still unable to connect and recieve an ‘Access Denied’ message. If this is the case, you need to give Administrator access to the host to your newly created user. In the vSphere client click on the ‘Permissions’ tab, in the right hand pane of the screen as shown here:

ESX host permissions

Right click in the list of users and choose ‘Add Permission’. Select the user you created and assign Administrator permissions, as shown:

Add local user permissions

Now you should find you can use your SSH client client to successfully log in to the ESX host. Once you are logged in using this user account you can use the su command to elevate your privileges to the root user.

Logging in using SSH

Now you have root access edit the /etc/ssh/sshd_config file by issuing the following command:

nano /etc/ssh/sshd_config

Find the line in the file which says:

PermitRootLogin no

and change it to:

PermitRootLogin yes

Press Ctrl-O, and then press Enter to save the file, and then press Ctrl-X to exit the file. Restart the sshd service by issuing the following command:

/etc/init.d/sshd restart

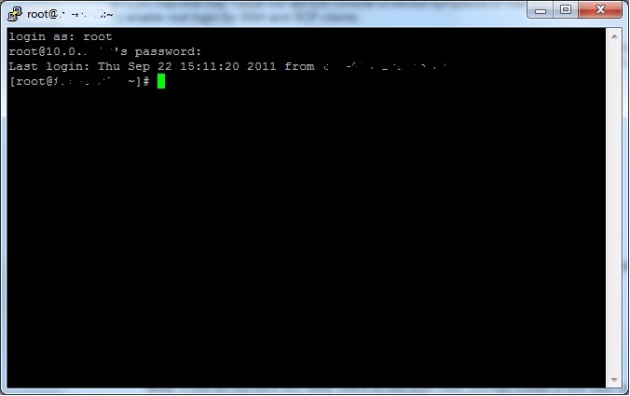
Quit your SSH session and start a new one , this time logging in as the root user. Root SSH access is now enabled.

Log in as root

You may want to delete the user account (in this example ‘testuser’) you created earlier at this stage, as it is no longer required.

References:

http://kb.vmware.com/selfservice/microsites/search.do?language=en_US&cmd=displayKC&externalId=8375637

http://kb.vmware.com/selfservice/microsites/search.do?cmd=displayKC&externalId=1024235